Dance Pad Adapter
2024-11-14 23:02 - Making
The History
Years ago there was justin.tv (with an interesting history, read the linked WikiPedia page!). The very short version is that it was focused on transmitting live video across the internet when this was very novel, generated success primarily around live streaming of video game play, and eventually became twitch.tv. I watch there somewhat regularly. Since it's live, it's possible and typical for viewers to interact with the streamer (typically viewers text chat and streamers speak/reply out loud).
One of my favorite streamers features a gimmick of using a dance pad to play games that were not intended for it. This is, to put it mildly, quite an impediment to the game play (and thus a source of extra challenge and entertainment). Situations (i.e. too difficult parts) arise where it becomes necessary to change to a regular controller and then back. To do this, the system menus must be opened and closed, and the game resumed. Often, the in-game settings must also be tweaked. A tedious process. At some point, I realized I could probably do something about this. And a useful project to hack on would be nice. So...
The Thing
More specifically, this situation involves a Nintendo GameCube Action Pad plus a GameCube Controller Adapter, to allow the GameCube native dance pad to be connected (via USB) to the Nintendo Switch console.
First just like the commercial product (though I'm not providing four ports) my project also allows a (any, but intended for the dance pad) wired GameCube controller to be plugged in, adapting this controller to instead act like a wired USB controller for the Nintendo Switch. To this we add the ability to configure button mappings — choosing which pressed button triggers which virtual output button. Specifically, the way some games expect the face (A/B/X/Y) buttons to be used on a typical controller don't mix well with the dance pad (which has A and B, but not X nor Y). There is a physical switch on the adapter, to choose between two of these custom mappings, for example one tweaked to work with a specific game but another that passes buttons through by default (the most direct possible translation).
Next, it also allows a wired Super Nintendo controller to be plugged in at the same time. Both of these controllers are always active, and either one (or technically both, though this would be confusing) can be used at any time. This allows switching to a more standard controller for more difficult game play sections, with no need to tweak any settings. It's the real "killer feature" that makes this adapter specifically better for this unusual situation.
At some point I realized I could build this with almost only parts I already have in stock, spares from previous projects. So I ended up doing no formal hardware design like I otherwise might have. Rather I simply planned out the wiring and built a single instance of it by hand. Since the spare parts I already had available were small, this turned out to be quite a challenge.

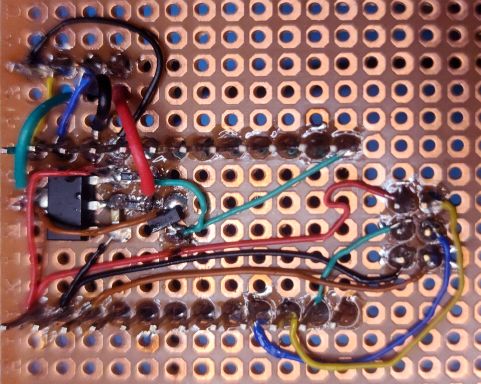
Here's that hardware. On the back side of what you can see is a (clone) Arduino Pro Micro. Added between its two rows of pins are a voltage regulator (the largest chip at the left) and a single transistor (the smaller chip to the right of that) perfboard — all the holes you can see are one tenth of one inch away from each other. This picture has the (green, black, and red) wires for the GameCube controller already present, near the top left. Later the wires for the Super Nintendo controller and switch were added. Towards the end of assembly, heaps of hot melt glue were added to keep everything in place.

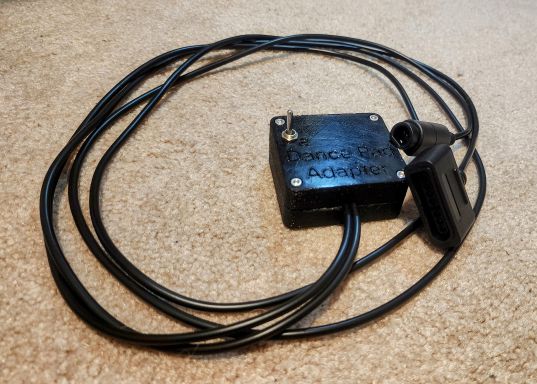
These were installed into a 3D printed case, designed for the purpose. The Arduino's USB port is exposed on the back (not visible in this picture) while the front side has the two extension cords that serve as the ports to plug the controllers into. (These extensions are all I had to buy to build this. No better way to add a standard game console "controller port" to a small hobby project.) On the face is the switch to select which of the two customized button mappings are active.
The Process
This took around a month of spare time, beginning to finish. I learned a lot! A whole lot of open source already existed to take care of the more standard parts of this (reading the controller inputs, emulating the USB controller for signal outputs). Along the way I discovered the LUFA (Lightweight USB Framework for AVRs) library. Very impressive, it supports a significant amount of functionality all on a tiny (32kB flash, 2.5kB RAM) microcontroller. Specifically I use USB HID (for the joystick) and Mass Storage (to allow a computer to reconfigure the button mappings).